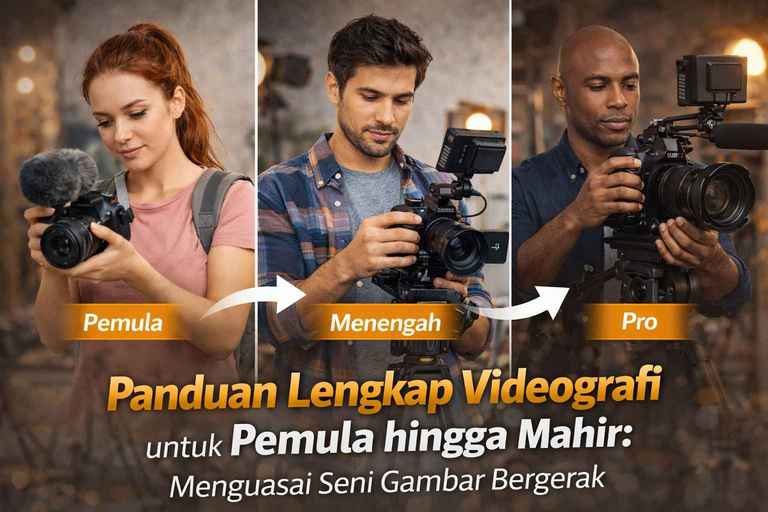
The Complete Guide to Videography for Beginners to Advanced: Mastering the Art of Motion Pictures
A complete guide to videography for beginners to advanced This is a compass for those of you who want to transform from being a “moment recorder” to a filmmaker that tells stories through visuals. In the digital age of 2026, video is no longer just a trend, but a universal language. Understanding videography means mastering the combination of camera technology, color psychology and sound rhythm. Whether you use a camera mirrorless heavyweight or smartphone, However, the cinematic principles we are discussing here remain a universally accepted industry standard.
Chapter 1: Camera Setting - Technical Basis of Cinematography
In a complete guide to videography for beginners to advanced Here, we have to agree that a camera is just a tool. However, a tool that is not configured properly will result in images that look amateurish, broken, or inconsistently colored. Understanding the innards setting The camera is the foundation before you can get creative with angles and stories.
1.1 Cinematic Frame Rate and “Motion Blur”
Frame rate (fps) is the number of still images that the camera captures in one second to create the illusion of motion. The choice of frame rate will determine look or the visual feel of your video.
- 24 fps (Standard Cinema): This has been the gold standard of feature films for decades. 24 fps gives a slight effect motion blur that are considered the most “expensive” and artistic by the human eye.
- 25 fps (PAL Standard): Used in Indonesia and European regions. Very similar to 24 fps but adapted to the mains frequency (50Hz) to avoid flicker on the lamp.
- 30 fps (NTSC Standard): Provides smoother and sharper movements. Often used for news broadcasts, vlog, or daily social media content.
- 60 fps or 120 fps (High Frame Rate): Used specifically to create effects Slow Motion. Do not use this for talking head videos as the results will look too “fast” and unnatural like cinema.
1.2 Shutter Speed Rule: Rule of 180 Degree
This is the most common beginner's mistake: setting the Shutter Speed arbitrarily. In videography, Shutter Speed should not be set freely like in photography.
Rule of 180 Degree Shutter states that Shutter Speed should always be 1/(2 x Frame Rate).
- If you are recording in 24 fps, Shutter Speed is a must 1/48 or 1/50 second.
- If you are recording in 60 fps (for slow motion), Shutter Speed is mandatory in 1/120 or 1/125 second.
Why is this important? If the Shutter Speed is too high (e.g. 1/1000 when recording 24 fps), the movement of the subject will look broken (staccato). If it is too low, the motion will look too blurry and dizzy to see.
1.3 Resolution and Aspect Ratio
The resolution determines the number of pixels and sharpness of the image.
- Full HD (1080p): It is still very relevant for YouTube and standard client needs. Its advantage is that the file size is light and does not burden the editing process.
- 4K (Ultra HD): Provides 4x the detail of 1080p. Very useful if you want to do cropping or digital zoom during the editing process without losing quality.
- Aspect Ratio: Use 16:9 for standard content (YouTube/TV) and 9:16 for vertical content (Reels/TikTok). If you want the impression of a very wide movie, you can try the ratio of 2.35:1 (Anamorphic look).
1.4 Picture Profile and Dynamic Range (V-Log & Flat)
Modern camera sensors are capable of capturing details in dark and light areas simultaneously. However, the standard color profile will usually “lock” the color, making it difficult to change during editing.
- Standard/Natural: Colors are mature, high contrast, ready to use.
- Log Profile (V-Log, S-Log, C-Log): The image looks very gray, pale, and without contrast.
- Advantages: Save dynamic range maximum. You can salvage details in the sky that are too bright or shadows that are too dark.
- Disadvantages: Must go through a process Color Grading in editing software. Highly recommended for those who want to reach an advanced level.
1.5 White Balance (WB): Consistency is Key
Never use “Auto White Balance” when recording a video. If the subject moves or the light changes slightly, the camera will change the color automatically, which will make it difficult for you during editing.
- 5600K (Daylight): For outdoor daylight.
- 3200K (Tungsten): For indoor yellow bulb lights.
- Custom WB: Use gray card to get the most accurate white color on set.
Chapter 2: Composition and Camera Movement - The Art of Visual Storytelling
In a complete guide to videography for beginners to advanced Here, we must understand that a camera does not just record events, but also “writes” stories. Composition in videography has the same basic principles as photography (such as Rule of Thirds), but moving images add a new dimension: Time and Movement. Well-planned camera movements can build tension, show scale, or create strong emotional depth.
2.1 Basic Shot Types (The Grammar of Cinematography)
Understanding the different types of shots is the basic language of cinematography. Each shot has a different psychological function for the audience.
- Extreme Wide Shot (EWS): Showing the subject in a very large environment.
- Function: Indicates location (establishing shot), a scale comparing the subject to nature, or a sense of isolation.
- Wide Shot (WS) / Full Shot: Features the subject from head to toe.
- Function: Shows the subject's interaction with the surrounding environment or full physical action.
- Medium Shot (MS): Showing the subject from the waist up.
- Function: Standards for dialog. Provides a balance between facial expressions and body language (gesture).
- Close Up (CU): Focus on the subject's face, from the shoulders upwards.
- Function: Capture emotions, reactions, and establish an intimate closeness between the audience and the subject.
- Extreme Close Up (ECU): Focus on specific details (eyes, fingers, or small objects).
- Function: Create extreme intensity, mystery, or show details that are crucial to the story.
2.2 Camera Angle
Where you place the camera against the subject determines how the audience perceives the subject.
- Eye Level: The camera is at the subject's eye level. Gives a neutral, equal, and honest impression. Most often used in interviews or documentaries.
- Low Angle: The camera is below the subject's eye level, looking upwards. Makes the subject appear powerful, majestic, dominant, or frightening.
- High Angle: The camera is above the subject's eye level, looking down. Makes the subject appear weak, vulnerable, small, or depressed.
- Dutch Angle / Canted Shot: The camera is tilted intentionally. Creates a sense of disorientation, tension, chaos, or psychological instability.
2.3 Motivated Camera Movement
Camera movement should not be done just because you “can” or because you have a gimbals expensive. Every movement must have a strong story motivation.
A. Movement on a Static Axis
- Pan (Panning): Shaking the camera to the left or right (horizontally) is like a head-turning motion.
- Motivation: Follow the subject walking horizontally or uncover the environment slowly.
- Tilt: Looking down or pointing the camera up or down (vertically).
- Motivation: Shows the height of a building, a comparative scale, or reveals details from the ground up.
B. Physical Camera Movement (Dynamic Movement)
- Dolly: Moving the entire camera body close to (Dolly In) or away from (Dolly Out) subject. It usually uses slider or dolly track.
- Motivation: Dolly In strengthening the focus on the subject's emotions. Dolly Out uncovering the new environment around the subject.
- Truck/Track: Move the camera body horizontally parallel to the subject.
- Motivation: Following a subject who is walking or running beside it gives the viewer the impression of walking with the subject.
- Crane/Pedestal: Move the camera body vertically (up/down).
- Motivation: Shows a broad perspective from above or down to the subject's level to start the scene.
- Roll: Rotate the camera orbital (like clockwork).
- Motivation: A totally disorienting effect, often used in scenes of dreams or chaos.
2.4 Choosing a Movement Aid
Different tools, different visual results.
- Tripod: For static shooting, pan, and tilt with precision. Mandatory for interviews or product videos.
- Handheld: Movements that are organic, raw, and feel real (shaky cam). Suitable for intimate action scenes or documentaries.
- Gimbal: Provides extremely smooth movement (floaty). Great for content travel or establishing shot elegant.
- Slider: For movement dolly or truck smooth and controlled short.
Chapter 3: Lighting in Videography - Creating Dimension and Ambience
In a complete guide to videography for beginners to advanced Here, lighting is not just about keeping the image dark. Light is a tool to direct the viewer's eyes, create depth (dimensionality), and establish mood or the mood of the story. Without proper lighting, even the most advanced camera sensors will produce images that appear “flat” or unprofessional.
3.1 Three-Point Lighting Technique (Industry Standard)
This is a basic technique that every videographer should master. It uses three different light sources to create balance and depth in the subject.
- Key Light:
- Function: The strongest light source that illuminates the subject. It is usually placed 45 degrees to the side of the camera and 45 degrees above the subject's eyes.
- Effect: It creates shape and dimension to the face, but also casts shadows on the opposite side of the face.
- Fill Light:
- Function: Placed on the opposite side of the Key Light with lower intensity (about 25-50% of the Key Light).
- Effect: Reduces or “fills in” the dark shadows cast by the Key Light to make the transition smoother.
- Back Light / Rim Light:
- Function: Placed behind the subject, slightly upwards.
- Effect: Create light lines along the subject's hair and shoulders. This is crucial for separating the subject from the background so that the image does not look “stuck” to the wall.
3.2 Light Quality: Hard Light vs Soft Light
As a videographer, you should know when to use “sharp” light and when to use “soft” light.
- Hard Light: Direct light from a small source (such as direct sunlight or a lamp without a cover). Produces very firm, high-contrast shadows. Suitable for a dramatic or mysterious feel.
- Soft Light: Light passed through modifier such as softbox, an umbrella, or a white cloth (diffuser). The shadows are very soft and the gradation is thin. This is the standard for interview videos, tutorials, or beauty (MUA) videos as it is very “friendly” to the skin texture of the face.
3.3 Understanding CRI (Color Rendering Index)
In 2026, there are many cheap LED lights on the market, but don't be fooled. Make sure your lights are rated CRI 95 and above.
- Why? A lamp with a low CRI will make the skin color (skin tone) the subject looks unnaturally greenish or purplish. This is very difficult (sometimes even impossible) to fix perfectly during the color grading.
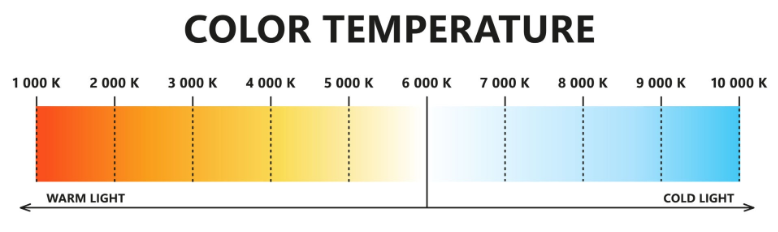
3.4 Color Temperature
Light has a color that is measured in units of Kelvin (K). Color temperature consistency is very important so that your video does not look “washed out”.
- 3200K (Warm/Tungsten): Yellowish-orange light (such as a light bulb or candlelight). Gives a warm and cozy feel.
- 5600K (Daylight): Light is neutral white in color (like daylight). Is the standard for professional video lighting.
- Mixed Lighting: Avoid mixing 3200K and 5600K light in one frame without a compensation filter, as it will make White Balance your camera goes haywire.
3.5 Using Natural Light
If you don't already have studio lights, the sun is the best and most difficult light source.
- Avoid Midday Sun: Avoid shooting under the sun at 12 noon as the light is harsh and creates “panda eye” shadows under the subject's eyes.
- The Window Trick: Use light from large windows. The window serves as softbox a very large natural area. Place the subject sideways against the window for a beautiful facial dimension.
3.6 Lighting Practice for MUA Video and Portfolio
For those of you who often work on content Make Up, Lighting is key to showing off makeup details.
- Use Ring Light or Large Softbox right in front of the subject to eliminate shadows in the pores of the face.
- Add one small light (Background Light) to illuminate the decorations at the back to make the video look more luxurious and professional.
Chapter 4: Audio Design - The Life of a Story
In a complete guide to videography for beginners to advanced Here's an industry adage that you'll want to keep in mind: “Audio is 50% of the movie, but it's 90% of the production value.” Clear sound gives a professional impression instantly. On the other hand, sound that is echoey, noisy or too small will make your content feel amateurish, no matter how expensive your camera is.
4.1 Why is the Camera's Built-in Microphone Not Enough?
Built-in microphone inside the camera body (such as on the Lumix GH5 or other cameras) mirrorless others) are designed for reference only.
- Weakness: Takes sound from all directions (Omnidirectional), captures lens focus motor noise, and the sound of your hand when holding the camera body.
- Solution: Always use External Microphone to achieve isolated and clear sound quality.
4.2 Getting to Know the Types of Microphones for Videography
Every situation calls for different tools. Choosing the right microphone is part of the advanced skill set.
- Shotgun Microphone:
- Character: Has a narrow sound capture pattern (Directional). Only captures sound from the direction in front of the microphone.
- Usability: Excellent for short films, documentaries, or mounted on top of a camera (On-camera mic) when vlogging.
- Lavalier Microphone (Clip-on):
- Character: It is small and can be clipped onto the subject's shirt collar.
- Usability: The gold standard for interview, tutorial, or talk content (talking head). The subject's voice remains consistent even if they move or turn their head.
- Large Diaphragm Condenser:
- Character: It is highly sensitive and captures sound details richly.
- Usability: Used for Voice Over (VO) or voice-over in a soundproofed room (studio).
4.3 Setting the Audio Level (Gain Staging)
Don't let your audio “break” or clipping.
- Target Level: Make sure the average human voice is in the range of -12dB to -6dB on your camera's level indicator.
- Peak: Don't let the signal touch 0dB (red color), because the sound will be distorted and cannot be fixed during editing.
- Noise Floor: Turn off the air conditioner, fan, or refrigerator when recording indoors to keep background noises quiet.
4.4 Mic Placement Technique (The 1-Foot Rule)
The secret to clear sound isn't just the price of the mic, but the distance.
- The closer the microphone is to the subject's mouth, the better the ratio of the original sound to the surrounding noise (Signal-to-Noise Ratio).
- To Shotgun Mic, use Boom Pole to get the mic as close as possible above the subject's head (just outside the camera frame).
4.5 Room Tone and Sound Effects (Foley)
At the advanced level, you don't just record dialog.
- Room Tone: Record the silence of the room for 30 seconds without anyone talking. This is very useful for patching dialog pauses during editing so that it doesn't feel “hollow”.
- Sound Design: Add sound effects (SFX) such as the sound of footsteps, the swish of the wind, or the clink of glass to give your video real texture.
Chapter 5: Post-Processing Workflows - Where the Magic Happens
In a complete guide to videography for beginners to advanced This brings us to the editing stage. If filming is the process of gathering ingredients, then editing is the process of cooking them. This is where the messy pieces of clips are put together into an emotional narrative. Editing is not just about cutting clips, it's about timing (pacing), fix the colors, and enhance the audio.
5.1 Stages of Professional Video Editing (The Workflow)
To make the editing process less confusing and more efficient, you need to follow a workflow (workflow) that are structured:
- Logging & Organizing: Import files from memory card to computer. Give the folder a neat name (e.g: Footage, Audio, Music, Assets). Don't let your files clutter up with names “C001, C002”, give them labels like “MUA_CloseUp_01”.
- Assembly: Arrange the best clips in the order of the story in timeline without thinking about transitions or colors first.
- Rough Cut: Cutting out unnecessary parts, adjusting the duration so that it's not boring, and making sure the storyline (rhythm) feels good to watch.
- Sound Design & Scoring: Add background music (backsound) and balance the volume between the voice of the person speaking and the music. Add sound effects (SFX) to give a sense of reality.
- Color Correction & Grading: Improved the colors to be consistent and give an artistic feel.
- Titling & Graphics: Add text, lower thirds, or the logo at the end of the video.
5.2 Understanding Color Correction vs Color Grading
Many beginners confuse these two terms. They are different but complementary.
- Color Correction (Technical): The process of correcting color errors while filming. The goal is to make the image look “neutral” and natural. This includes fixing White Balance the wrong one, raising Exposure and ensure the skin color (skin tone) looks normal.
- Color Grading (Artistic): The process of giving “character” or mood on the video. For example, giving bluish shades for a cold/sad impression, or warm orange shades for a happy/romantic impression. This is where you use LUT (Look Up Table) as a color base.
5.3 Editing Software: Choosing Your Weapon
In 2026, the competition of editing software is getting tougher with integrated AI features.
- Adobe Premiere Pro: Industry standard for fast editing, excellent integration with After Effects and Photoshop. Excellent for YouTube and social media content.
- DaVinci Resolve: King of kings for Color Grading. This software is used by Hollywood movies. The free version is already very powerful for professional needs.
- Final Cut Pro (FCP): Mac users only. Extremely fast in processing rendering and has a very intuitive interface.
- CapCut Desktop: Don't underestimate this. For quick content (TikTok/Reels), CapCut offers great efficiency with ready-made music assets and transitions.
5.4 Cinematic Transition Techniques
Avoid using “tacky” transitions such as page peel or star wipe. Videographers are adept at using smooth transitions:
- J-Cut: The sound of the next clip appears before the image.
- L-Cut: The image has moved on to the next clip, but the sound from the previous clip is still briefly heard.
- Match Cut: Connect two different scenes using similar compositions or movements (e.g. people throw a ball in scene A, the ball turns into the sun in scene B).
5.5 The Importance of Proxy Editing for 4K Videos
If your computer feels heavy (slow) when playing 4K videos, use the technique of Proxy.
- What is a Proxy? The camera or software makes a copy of the video in a low resolution (e.g. 720p). You edit using those lightweight files to keep things smooth, and during the process Export/Render, For example, the software will automatically use sharp 4K native files. This is the secret of professional editors to work fast without lag.
Also Read: DaVinci Resolve 20: Minimum Hardware Specifications and Key Components for Maximum Performance
Chapter 6: Distribution Strategy, Portfolio, and Videography Business
In a complete guide to videography for beginners to advanced Here, mastering the camera and editing is only half of the journey. The other half is how your work is seen by the right people and how you build a business ecosystem around it. In 2026, being a successful videographer means being your own marketer.
6.1 Building a Portfolio that Sells (Showreel)
Showreel is a short 1-2 minute video that summarizes your best work.
- Key Principles: Put your best work in the first 10 seconds. The audience (and potential clients) have a very short attention span.
- Content Variation: Display the types of techniques we discussed in the previous chapter: smooth camera movements, color grading consistent, and strong sound design.
- Platform: Besides Instagram and TikTok, save your high-resolution portfolio on platforms like Vimeo or embed it (embed) directly on the dedicated page at agusarmanto.com.
6.2 Understand Video Distribution Algorithms
Each platform has different technical characteristics. Proficient videographers don't just upload one and the same file to all places.
- YouTube: Requires 4K resolution, 16:9 aspect ratio, and optimization on the Thumbnail as well as the first 30 seconds to keep retention rate.
- Instagram Reels & TikTok: Requires a vertical aspect ratio of 9:16. The key is hook (attractiveness) in the first 3 seconds and the use of trending yet audio-quality music.
6.3 Defining a Videography Niche
Don't try to be a “Videographer of Everything”. Specialization will make your selling point higher. Some popular niche markets include:
- Wedding Cinematography: Focus on emotional moments and luxurious aesthetics.
- Corporate & Branding: Create professional company profile videos or product advertisements.
- Content Creator Partner: Become a production team for YouTubers or influencer Great.
- Event Documentation: Capture the excitement of a concert, seminar or community event.
6.4 Business Management and Pricing
Many budding videographers have been financially ruined by getting the pricing wrong.
- Calculate Production Cost: Don't just count services. Calculate tool depreciation (gear depreciation), editing software subscription fees, transportation, and electricity costs for the editing software. rendering.
- Package System: Create service packages (e.g. Budget, Standard, Premium). This makes it easy for clients to choose within their budget without having to do painstaking negotiations.
- Employment Contract: Always use a written contract. Make sure the points about the number of revisions, down payment (DP), and copyrights are clearly mentioned to avoid disputes in the future.
6.5 Facing the Future: Videography and AI
In 2026, artificial intelligence (AI) has radically changed the videography workflow.
- AI for Efficiency: Use AI to do transcription (automatic subtitles), color matching automatic between clips, to extreme noise clearance.
- Human Touch: While AI can produce visuals, it lacks empathy. Your ability to understand the client's wishes and give an emotional touch to the story is something that no machine can replace.
Closing: Your Next Step
A complete guide to videography for beginners to advanced this is your roadmap. However, a map is useless if you don't get going. Videography is a skill that is honed over time. Don't wait to own the most expensive camera to start creating. Start with what you have, apply proper composition techniques, pay attention to sound quality, and keep experimenting.
Stay tuned agusarmanto.com for updates on the latest editing techniques, reviews of the latest camera equipment, and practical tips from the field. Let's create visuals that are not only beautiful to look at, but also meaningful to remember.
Chapter 7: Glossary of Videography Terms & FAQs
In a complete guide to videography for beginners to advanced This being said, sometimes the biggest obstacle for beginners isn't technique, but confusing technical language. Mastering the terms below will help you communicate professionally with film crews, clients, or fellow editors in the community.
7.1 Glossary of Key Terms
- B-Roll: An additional clip inserted over the main clip (A-Roll) to illustrate what is being talked about. Very important to cover up rough editing cuts.
- Bit Depth: Refers to the amount of color information in each pixel (e.g. 8-bit vs 10-bit). The higher the bit depth, the smoother the color gradation (preventing appeal).
- Codecs: Technologies for compressing and decompressing video files (e.g. H.264, H.265, Apple ProRes).
- Dynamic Range: The ability of the camera sensor to capture details in the darkest and brightest areas simultaneously without losing information.
- LUT (Look Up Table): A mathematical file that converts color values from one color space to another. Often used as a basic “filter” in color grading.
- ND Filter (Neutral Density): “Sunglasses” for camera lenses. Works to reduce the light coming in so that you can still use the camera lens. Shutter Speed low in broad daylight.
- Rolling Shutter: Distortion effect (image looks skewed/shaky like jelly) that occurs on the CMOS sensor when the camera moves too fast.
- Timecode: A sequence of numbers used to synchronize video and audio from multiple sources in order to keep the precision of per frame.
7.2 FAQ: Beginner to Advanced Frequently Asked Questions
Q: What is the best camera for videography in 2026? Answer: There is no one best camera for everyone. However, for hybrid use (photo and video), the Panasonic Lumix GH series, Sony Alpha (A7S III/A7 IV), and Canon EOS R series remain the leaders. The most important thing is to make sure the camera supports built-in 10-bit recording and has a capable stabilization system (IBIS).
Q: Do I have to record in 4K resolution all the time? Answer: You don't have to. If your content is only for WhatsApp needs or internal documentation that does not require cropping, 1080p (Full HD) is sufficient and saves storage space. Use 4K for commercial projects, clients, or YouTube content that you want to “preserve” the quality for the long term.
Q: How to get the “Cinematic Look” with a minimal budget? Answer: Cinematic look It's not about the camera, but about lighting and composition. Use techniques three-point lighting, record at 24 fps with shutter speed 1/50, use a lens with a large aperture (f/1.8) for a blurred background, and do color grading simple to provide mood on your video.
Q: Why does my video look broken after export? Answer: Usually this happens because of a mismatch between Frame Rate original recording with Frame Rate when exporting. If you are recording at 24 fps, make sure Timeline and Export settings You are also at 24 fps. Don't force a 24 fps video into a 60 fps timeline without technique frame interpolation.
Q: Will AI replace the role of videographers? Answer: AI will replace tedious technical tasks (like auto-cutting clips, cleaning up noisy audio, or tracking objects). However, AI cannot replace artistic vision, humanity in storytelling, and creative decision-making on set. Use AI as an assistant, not a replacement.
Estimated reading time: 18 minutes