Frame Lapse Tutorial Complete Indonesian Language
This Complete Indonesian Lapse Frame Tutorial is a continuation of the previous article Frame Lapse, Free Android App to Create Time Lapse. Because this discussion is a bit long, I made a separate article specifically about the tutorial for using Frame Lapse.
Let's jump into the tutorial and menu in Frame Lapse:
Let's jump into the tutorial and menu in Frame Lapse:
1. Play Menu
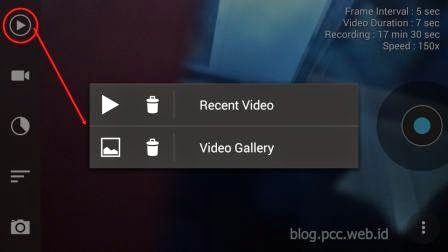 |
| Play Menu Display |
To play a video that has been created. There are two options,
Recent Video => play the latest video Galley Video => Choose from the Video gallery.
One of the advantages of Frame Lapse is that we can immediately play the resulting video without having to go through the rendering process first.
2. Video Resolution Settings Menu
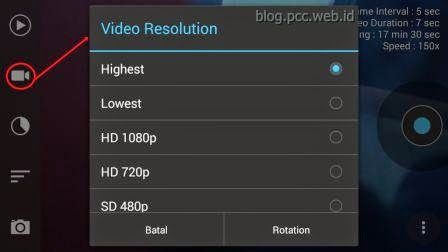 |
| Video Resolution Menu Display |
You can select the desired Video resolution in this menu.
Highest => Highest resolution as per camera capability
Lowes => The lowest resolution the camera is capable of
HD 1080p, 1920×1080 pixel resolution
720p HD, 1280×720 pixel resolution
SD 480, 720×480 pixel resolution
below there is also a rotation menu with options Landscape (Default), Portrait, Reverse Landscape, Reverse Portrait
3. Frame Interval Setting Menu
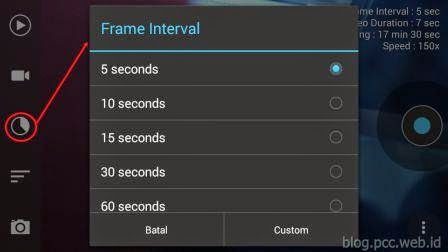 |
| Interval Settings menu view |
In this menu you can set the interval of image capture, whether 5 seconds, 10 seconds, 15 seconds, 30 seconds and 60 seconds.
There is also a menu User defined and CustomThis menu allows users to set their own time outside of the time options above, but this menu only works on the pro/paid version.
4. Video Duration Settings Menu
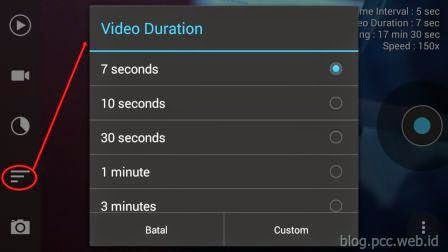 |
| Video Duration Setting Menu Display |
In this menu you can determine the duration of the final video you create. There are 7 seconds, 10 seconds, 30 seconds, 1 minute, 3 minutes, 5 minutes, 10 minutes, 30 minutes and 1 hour options.
To set a duration other than the above options, you must use the pro/paid version.
After you have selected the duration option, the top right corner will automatically display a Description Recording (the amount of time it takes to create a video of the duration you choose).
5. Camera Settings Menu
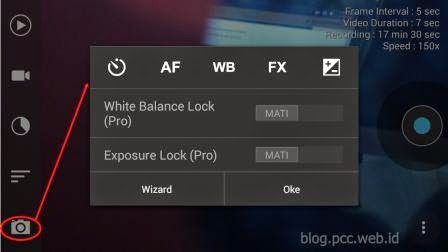 |
| Camera Settings Menu Display |
In this menu you can set Autofocus, White Balance, Filter Effect and Exposure Compensation. The White Balance Lock and Exposure Lock menus cannot be clicked, as they are only available in the pro/pay version.
The following is a detailed menu of the camera settings:
- Auto Focus Mode
 |
| Autofocus Mode menu display |
- Auto, Focus is set automatically by the camera
- Infinity, Infinite distance, used to focus on objects that are far away, such as stars etc.
- Macrosfor shooting macro or close-up objects such as details of flowers, insects etc.
- Continuous Videousually used for photographing moving objects
- White Balance
 |
| White Balance Settings Menu Display |
- Auto : White Balance is set automatically by the camera
- Incandescent : Used for shooting indoors where the lighting is from a light bulb
- Fluorescent : Used for shooting indoors where fluorescent lighting is used
- Warm-fluorescent
- daylight : used when in sunlight
- cloudy-daylight ; used when the weather is cloudy
- twilight:
- shade : used when in the shadows, not direct sunlight
- Filter Effects
 |
| Filter Effect Menu Display |
Its function is to add image effects
- Mono: Black and white image
- Negative : Film negative-like effect
- Solarize This special effect will reverse the color of the image object so that it forms its negative color.
- Sepia : mix of brown and gray
- Posterize : is an effect to divide the color into several levels
- aqua : effects such as clear plastic and water
- Emboss : embossing effect
- Sketch : drawings like sketches
- Neon : Fluorescent light effect
- Exposure Compensation
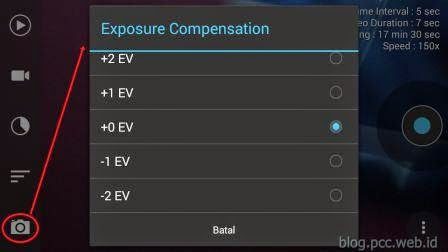 |
| Filter Effect Menu Display |
Used to adjust the brightness level of the image, ranging from -2 EV to +2 EV
6. Setting Menu
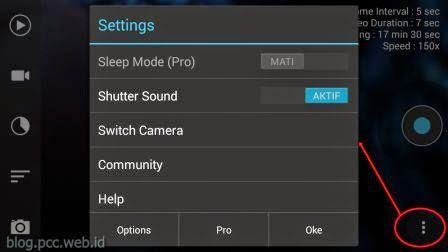 |
| Filter Effect Menu Display |
On the settings menu:
Sleep Mode (Pro) : Only active in the pro/pay version. With this menu you can turn off the screen during the recording process, thus saving battery power.
Shutter Sound : To turn the sound on and off when the camera is snapping
Switch Camera : to change the front or rear camera used
Community : Facebook and Google Plus Community page menu links from Frame Lapse
Help : Manual use of Frame Lapse
Reset : To return the Frame Lapse setting to the Factory setting
About : Version description of Frame Lapse
Options (at the bottom left corner of the Setting menu display):
High Performance : Unless there is a problem, leave it on. This setting helps the app to work faster
Notification Light : Turn the notification light on and off
Show Information: Show and hide information in the upper right corner
Torch Light : turning the Flash Lamp on and off
Storage Directory : Change the storage directory/folder
Video Frame Rate Frame Rate 24 fps, 25 fps, 30 fps
Zoom : To change Zoom (image magnification)


My phone is 2gb ram, but FL can't record yes gan. Any solution?
Doesn't support redmi note 3 gan, any solution?
my hp ram 1.5 gb can really gan emg hp what gan